For readers arriving from image to stl, this article explains how to judge a printed cookie cutter for food safety—from filament choice and cleaning to safe, short-contact use with dough.
A printed cookie cutter can be a practical short-contact tool for dough you’ll bake, but the filament is only part of the safety question. Layer lines, printer hardware, washing, and heat all affect how I would use one in the kitchen.
The short version
- Treat a printed cutter as a brief-contact tool for dough you intend to bake. An outline cut, or a sheet of food wrap between the print and dough, limits contact.
- Pick PLA or PETG whose maker states that the filament complies with food-contact requirements. For this job, I favor an uncolored option and a stainless steel nozzle.
- Clean the cutter by hand with dish soap and warm water each time you use it. Replace it when scratches make the surface harder to clean.
- Skip the dishwasher for PLA. It can soften around 60–70 °C, leaving the cutter warped.
Food-contact filament is not the whole answer
When I need a cookie cutter STL generator, I look for a shape that will cut cleanly and be straightforward to wash. SupaVoxel’s Cookie Cutter Generator produces a watertight file with a cutting edge and a lip, but a printable file does not make the finished object hygienic by itself.
The difficult part is the printed surface. An FDM printer builds the cutter in layers, leaving narrow spaces between deposited lines. Dough can lodge there, and washing may not reach every crevice. Scratches create more places for residue to collect. That is why I treat a printed cutter as a short-contact tool, not as a dish or a permanent replacement for a stainless steel cutter.
There is also a difference between a filament maker’s food-contact claim and the cutter that comes off your printer. The claim concerns the material. The finished tool has also passed through a nozzle and acquired a layered surface that you must clean. Check the spool’s stated compliance, but do not take it as a guarantee about your entire printing process.
Choose filament and printer hardware deliberately
For a cutter that may touch dough, I would choose PLA or PETG only when its brand states food-contact compliance. Natural or uncolored filament is preferable. I would leave wood-, metal-, and carbon-filled composites out of this project, along with resin prints. A familiar material name on a spool is not, by itself, a food-contact statement.
A brass nozzle may contain lead. For an item intended to touch food, stainless steel is the safer nozzle choice. Selecting a suitable filament without considering the hardware it flows through addresses only part of the question.
Heat matters too. PLA begins to soften at roughly 60–70 °C, so I would not put a PLA cutter through a dishwasher or wash it in hot water. PETG is an alternative filament, but changing materials does not eliminate the crevices between printed layers. If I wanted a cutter for frequent use and dishwasher cleaning, I would choose stainless steel instead.
Make a cutter that works without a fragile edge
The shape affects cutting and cleanup. A slender wall can make a neat cut but may bend when pressed. Narrow points can snag dough, leaving pieces to pick out of the cutter afterward. A lip distributes pressure across your hand and stiffens the perimeter, so I would keep it even if the cutting wall looks substantial in the preview.
The generator’s controls offer useful starting points:
- Cutting wall — the default is 1.0 mm; for a cutter larger than 100 mm, the page advises 1.2 mm.
- Lip width — the default is 3 mm, adding stiffness and a more comfortable pressing surface.
- Sharpened edge — enabled by default to improve the cut.
- Longest side — measured across the lip as well as the cutting shape, so the cookie will be smaller than this setting.
I would avoid spiky outlines and details narrower than 5 mm: dough can stick in them and tear on release. For a detailed shape, chill the rolled dough and dust the cutter lightly with flour before pressing.
If you start with a drawing, make its outer contour bold and closed. The generator accepts a silhouette image, but uses only its outside boundary; interior marks in an uploaded design will not become cutting or imprint walls. For a photographed drawing, adjust the tracing threshold while watching the preview. This is worth doing before you print: a stray bump in the outline becomes a bump you must cut with and clean around.
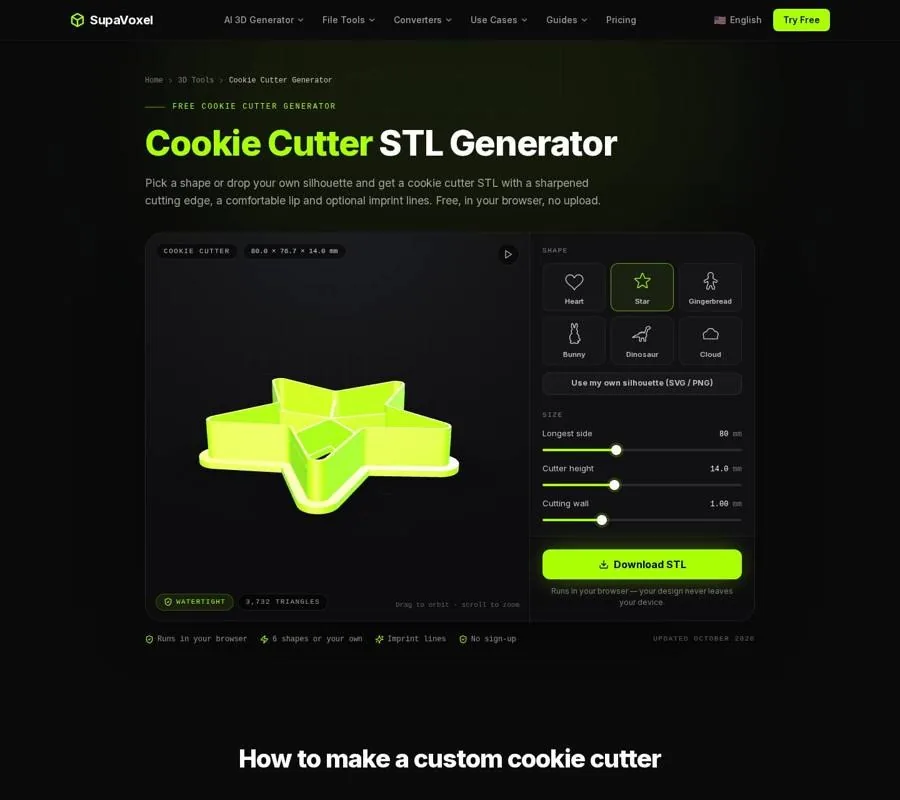
The Cookie Cutter Generator page shows the shape preview and the controls for the cutting wall, lip, and edge.
A short-contact workflow I would use
- Print in the exported orientation. Place the lip against the bed and the cutting edge upward; supports are not needed for that orientation. Use enough perimeters to make the cutting wall solid, rather than leaving an infill gap inside it.
- Inspect the finished cutter. Check the edge, points, and lip for rough spots or damage that could catch dough. A cutter that develops scratches through use is easier to replace than to keep cleaning around a damaged surface.
- Keep contact brief. Cut the outline in dough you plan to bake. For a barrier, cover the dough with food wrap and press the cutter through the sheet.
- Clean and store it carefully. After use, hand-wash with warm water and dish soap and let it dry completely. Do not put a PLA cutter in the dishwasher.
I would also check the first cut before pressing through the rest of the dough. If a point sticks or the wall bends, forcing harder is unlikely to improve the shape. Flour and chilled dough may help with sticking; a wider feature or sturdier wall is the better answer to a design that flexes. Those are print and dough-handling fixes, though, not substitutes for the material and cleaning precautions.
This workflow limits avoidable contact and wear. It does not turn a layered plastic surface into one that can be cleaned as readily as stainless steel.
When a stamp or a mold is a different project
A cutter defines the outside of a cookie; it may not make the interior detail you want. The generator can add imprint lines to its built-in star, gingerbread, and bunny shapes, but an uploaded silhouette contributes only its outer contour. For a separate fondant impression, I would use SupaVoxel’s SVG to STL converter in stamp mode. That mode reverses the design on a raised block so the pressed mark reads correctly. I would apply the same filament, nozzle, and cleaning cautions to a printed stamp that touches food.

The SVG to STL page includes stamp mode for turning a flat design into a raised impression tool.
A casting mold solves a different problem. SupaVoxel’s STL mold maker carves a model’s cavity into a rigid printed block, yielding matched halves with alignment keys and an opening for pouring. Casting silicone parts is among its uses. That does not establish that a resulting part is suitable for food: check the casting material’s own food-contact claims and its compatibility with the print material.

The STL Mold Maker page shows the controls for producing the two halves of a casting mold.
If these contact and cleaning trade-offs do not suit your kitchen, the 3D Tools collection includes makers for projects such as keychains and lithophanes. A printed gift or decoration can accompany a baking project without touching the dough.
FAQ
Is a food-contact PLA cutter automatically safe to use?
No. A filament claim does not account for crevices in the printed surface or the hardware used to make it. Consider the whole print, keep dough contact brief, and clean the cutter after use.
Can I put a PLA cookie cutter in the dishwasher?
No. PLA may soften at about 60–70 °C and lose its shape. Wash it by hand using warm water and dish soap, then allow it to dry fully.
Will food wrap solve the cleaning problem?
It provides a barrier while you cut, but it does not make the cutter maintenance-free. Wash the print after use and replace it if the surface becomes scratched.